
Note: I originally intended to try out some thermal testing on this case. It turned out that the PSU (Apevia 250w flex atx) that I bought, was a dud. Unfortunately this means that this review will not include thermal testing! Maybe in the future I may try it again…
Geeek A10 review
Sections
Intro
Features/Specs
First Impressions
Exterior
Interior
Conclusion
Extra
Additional Pictures
As many of you might have already noticed (from my Hidden Gems posts and such), I am a fan of spreading knowledge about lesser known mini ITX cases and other hardware. I enjoy the idea of hunting down rare and different cases and trying out new and unfamiliar hardware! This curiosity led me to run into the Geeek Instagram page a few months ago. Right away I noticed that they were a new company with very few followers (at the time), and that they had very aesthetically pleasing product!
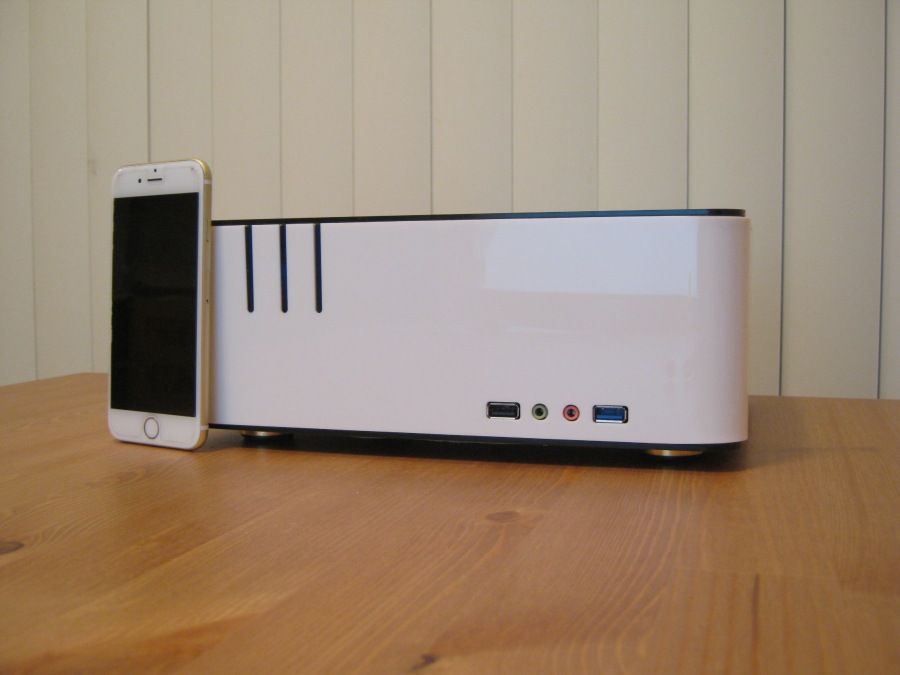
From the looks of their Instagram page and their website, they have produced about half a dozen different case designs, mostly mini ITX chassis. One of their most recent productions is the A10 case. A simple and elegant white acrylic mini ITX case, it has a very small footprint while still having the ability to fit a GPU.
The Geeek A10 is currently available for $34.95 usd and ships internationally from Taiwan, which is where Geeek is located. Shipping for me to the US is around $18 but may vary to other parts of the world. Including shipping, the case sits at around the $50 price mark which means it can generally be looked at as a budget-mid range case.
You can check out the Geeek A10 at Geeek’s website HERE
Features/Specs
The A10 is on the lower end of the spectrum when it comes to size and price, however in features it is not. Some of the specs and features that come with the A10 are:
-Dimensions: 271mm[H] x 234mm[W] x 100mm[D]
-Support for 2x 2.5in HDD
-Front panel: 1x USB 3.0, 1x USB 2.0, power,reset,audio jacks
-Supports flex ATX or DC-DC ATX power supplies
-Supports small (low profile) graphics cards
-Supports 1x 80mm fan
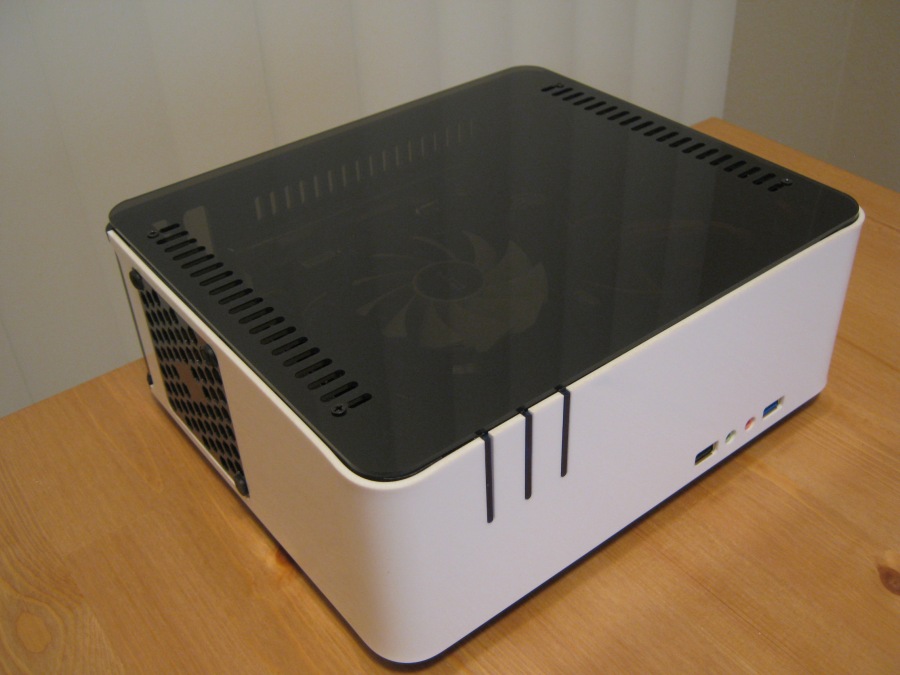
-Can be placed upright or laid flat
-Lightweight acrylic chassis
-Aesthetically pleasing white and black exterior

First Impressions
One of the first things I noticed about the case was that it came in very simple, small packaging. As a lightweight acrylic case it made sense, it doesn’t have much weight on it to damage itself. The case was wrapped in a simple half-inch thick foam sheet, and although this may make a few people feel cautious about the integrity of the case, I assure you the foam was more than enough to keep the exterior of the case intact. Another important measure that kept the case in good shape was the plastic sheeting that covered just about the entirety of it. The sheeting was precisely placed, and gave a very satisfying feeling when being peeled off and exposing the shiny acrylic below.

The case came with an owners manual, which is just instructions printed out and stapled together, but nonetheless it came in handy when it was time to screw everything into place. Being that it is an acrylic case, and a very small one at that, the design has some limitations, which means that just about everything in the case is put in or put together using screws. The case comes with every screw necessary and the instruction manual does a decent job of pointing out which screws are used for what, so the whole process of screwing everything in didn’t really feel too fatiguing or annoying.

Overall the case is very easy on the eyes, especially after all of the plastic sheeting is pulled off, and although the included accessories and manual seem very simple and possibly underwhelming, they are useful and in the end that’s all that matters.
Exterior
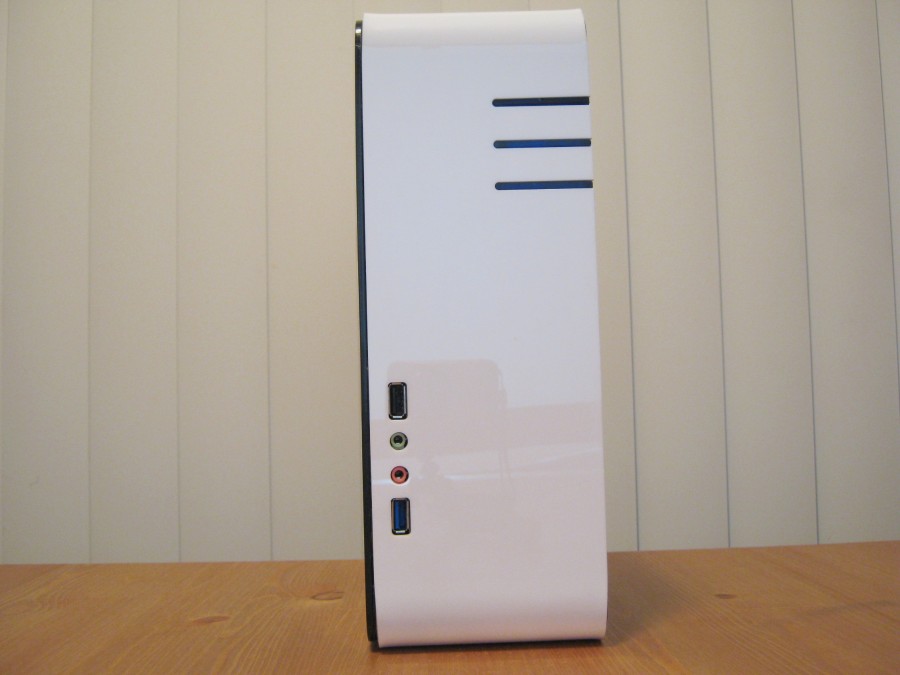
The case is primarily white, but sports a black front/top panel, black base panel, and black fan grill. Three stripes on the front end of the case mark the area where power and reset buttons, and blue power and HDD lights all sit. In my opinion this looks very clean and elegant, and the buttons had a satisfying click. Also on the front panel sit the USB ports and audio jacks. They are placed in an ambiguous manner which is great because they work well while the case is placed in either orientation. My only complaint is that it does not have 2 USB 3.0 ports, but considering the price of the case I suppose this is understandable.
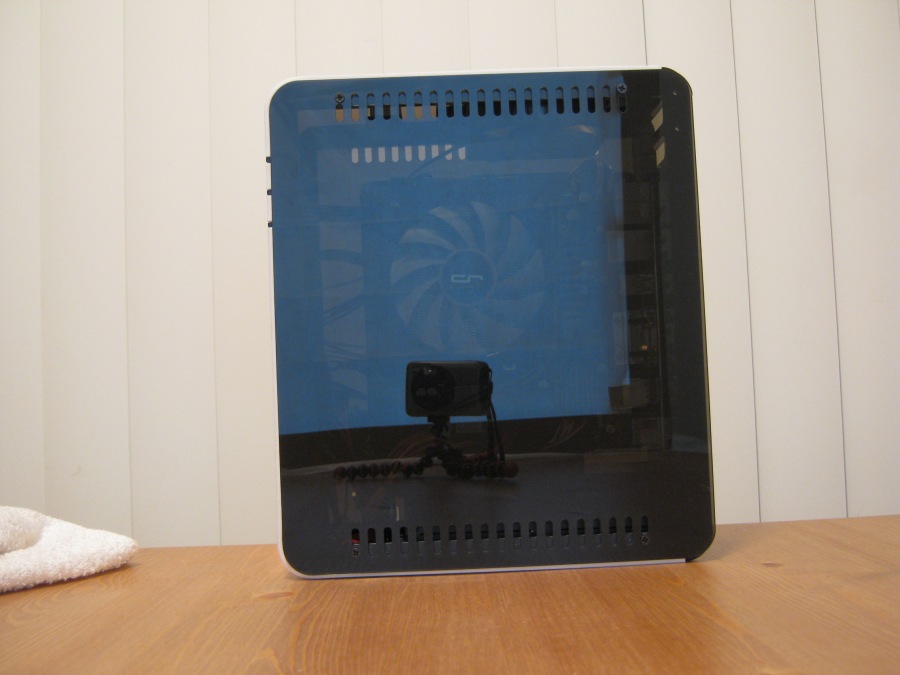
The side/top panel is a tinted see-through black acrylic with sets of vent slots on the top and bottom ends. It is very minimalistic and resembles tempered glass, and is held into place only by 4 screws. The panel covers the entire side/top of the case.

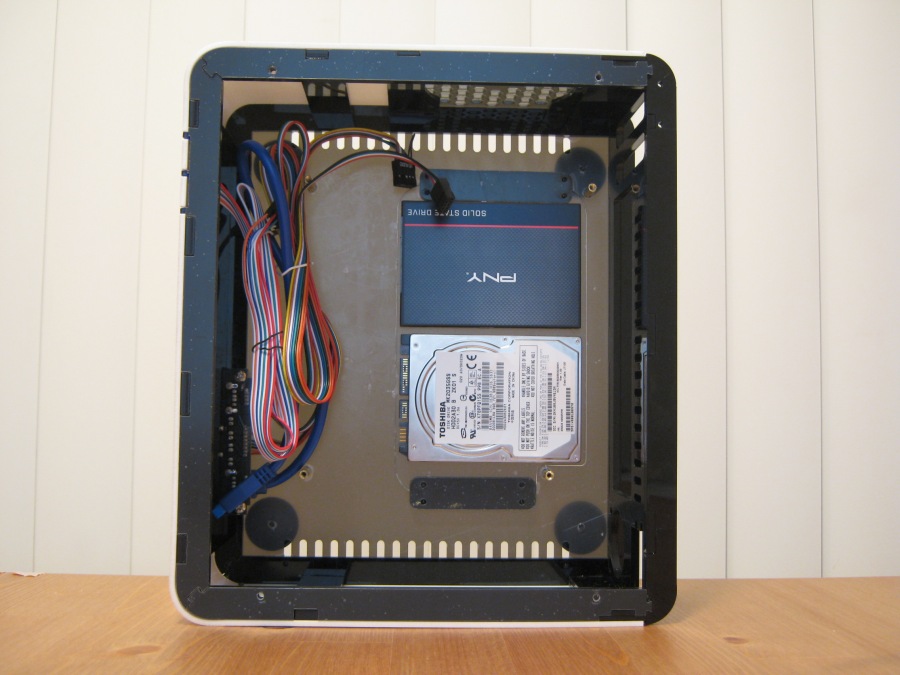
The base panel is also black and has two sets of vent slots, but it also features a “cut out” in the middle that allows for two things: the cutout can support two 2.5in HDD’s using screws, the cutout allows the builder to get to the area behind the motherboard. As you can see above, there are many screws on this panel. These screws hold together various things including the motherboard stand-offs, the feet for the case (horizontal layout), the panel itself, and the cutout piece and HDD’s as well. Please note that I decided not to remove the plastic sheeting on this panel, this is why it looks as if it is peeling around the edges and near the screws.


The I/O panel is quite simple. Just enough space to fit the motherboard I/O, flex ATX PSU power port, dual slots for a GPU or other extension card, and a set of vent slots along the length.

The top/side of the case features the only fan support for the entire case. An 80mm fan slot with an attractive black hexagonal grill. Note that I did not take off the plastic sheeting on the grill. I find it interesting that there is only one 80mm fan slot, and it is the major reason I wanted to test thermals in the case. I feel that, considering the amount of vent slots on both side panels, as well as the I/O panel, that the fan placed here might be most useful as an intake fan, seeing as most likely, making it an exhaust fan would create negative air pressure which would suck in dust through the vent slots throughout the case.
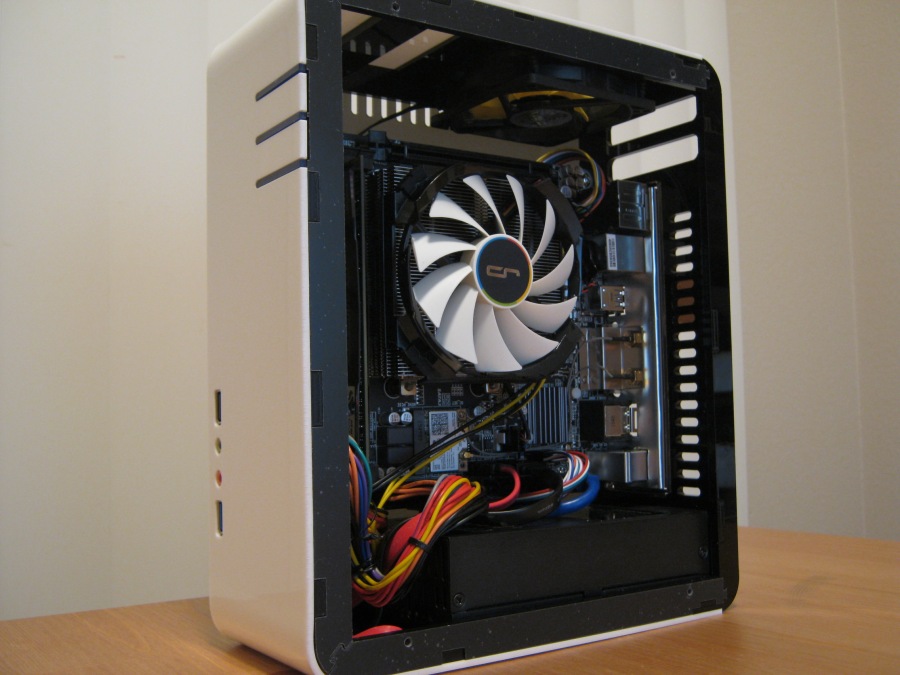
Interior
The interior of the case is very simple, yet quite intriguing. Right off the bat I noticed that the cables are not very attractive in regards to color, but being a budget case that is not meant to show off the interior all that much, I feel this is fine. The one interior layout feature that most intrigued me is the use of tall motherboard standoffs that allow about an inch of space behind the motherboard. This allows the 2.5in HDD’s to sit comfortably behind it, and even allows enough space for a few cables to easily pass behind the board as well.

Above you can see one of the tall stand-offs in its location. I’d like to point out that the picture does not do a good job at showing the length of the stand-off in comparison to the depth of the HDD. There is more space than can be assumed through this picture.

As shown above the layout is quite simple. Flex ATX power supply fits firmly on the lower end, motherboard almost directly in the middle, and at the top there is a gap of space large enough to allow a small GPU. Geeek advertises that the case can only fit 1-slot low profile GPU’s however from what I noticed it is possible to fit a dual slot GPU as long as: 1. it is not too long, 2. it is not too wide as the case is rather slim (even my Asus Radeon HD 6670 was too wide), and 3. You have to sacrifice the 80mm fan. This being said I don’t think it will be very easy to find any graphics card with any significant power to put into this case. The only ones I can think of are maybe an Nvidia Quadro as many of them are generally smaller/slimmer and possibly some sort of small GTX X50 or Radeon R7 card.

For the sake of cable management I decided to slide a few cables behind the motherboard. I decided to tape them down in certain areas to keep them away from the motherboard. This seemed to work well and I was able to place the motherboard into its rightful spot without much effort. This is a good indication of the height of the stand-offs.

I noticed that the interior has a bit of extra real estate that may allow for additional 2.5in HDD’s. Most notably the front panel area and even the top panel next to the 80mm fan. Of course if you choose to use an external power supply, there is also space in the area where the flex ATX PSU sits. Something to keep in mind.
Conclusion:
Overall I was very pleased with this case. Everything from the simple but pleasant aesthetics, to the interior layout, to the measures used to keep the acrylic in quality condition, impressed me. Geeek definitely seems wise beyond it’s years and definitely did a great job despite being a newborn company.
I want to address a few things regarding layout and support. The two things that come to mind are mostly the GPU and PSU support.
First off the dual expansion slots seem a bit misleading because the case simply does not do a great job at supporting dual slot GPU’s. It seems as though they made one too many compromises somewhere along the design process. However after considering things like the size, form factor, and price of the case, it is pretty clear that this case IS NOT necessarily an enthusiast gaming case. So knowing this, that this case is most likely targeted more towards the living room experience/HTPC/workspace market, the possibility of adding a GPU should be considered an added bonus, in my opinion! I think this case would do great with an AMD APU at the heart of it.
In regards to the flex ATX PSU it may be a bit discouraging to have to track down a reliable one, as it seems there are not too many high quality options in the marketplace. There are some I am aware, but they seem to all be units that lack aesthetics. Ugly grey metal and red/yellow cables plague the flex ATX PSU market, and the only half decent looking one I could find turned out to be a dud. Despite this, to be honest, after seeing that the black panel is not very transparent, I think it wouldn’t be too difficult to track down a reliable unit, regardless of looks. An external PSU is also a viable option.
As mentioned before, personally I find this case to be a great option for anyone looking for an aesthetically pleasing HTPC or simple workstation PC. An AMD APU or even an Intel CPU with integrated graphics would feel right at home in this thing, and if you can find the right GPU, more power to you! The options in orientation and overall size make it a very versatile chassis that would look great displayed in just about any setup.
Taking into consideration what this case is best utilized for I rate the case a: LOVE IT
Important
As you may have already seen on my Instagram page, I have partnered with Geeek and am preparing to raffle out this review unit to one of you guys soon! So please keep an eye out for the post and be prepared to follow the rules to enter the raffle if you are interested in winning the case!
PLEASE NOTE: I will ship to a US winner on my wallet. With the price of international shipping, I cannot exactly afford to ship internationally. However, I AM WILLING to split the shipping cost with the winner if they are international.
In the meantime check out Geek’s Instagram page HERE
or check out their website HERE
Thanks for reading! Make sure to give me feedback on this review by leaving a comment on my Instagram pics!
Hector
@mitxlove
————————————————————————–
Additional Pictures


Honestly I love this case. It’s simplicity is just like a Mac mini style computer. I just built a new sky lake full tower build and I’ve been looking at mini itx boards and looking to building a small PC to fit on my desk that won’t be pushing a lot. This case is amazing and for such a inexpensive price you can’t beat it. Good job on a review
LikeLiked by 1 person
Thanks for you input! What is your Instagram handle?
LikeLike
Looks really nice! I wish cable management was better. But it’s also really affordable.
LikeLiked by 1 person
Yes defintely for the price the cable management is acceptable! Please let me know your Instagram handle or comment on the Instagram page saying you commented on here to get entered in the raffle!
LikeLike
Amazing this looks like a phanteks case or something great in depth review to I might grab one of these for my super budget htpc
LikeLiked by 1 person
This would be a great case for an HTPC! Let me know your Instagram handle or comment on the insta post letting me know that you commented on here so I can add you to the raffle!
LikeLike
Wow, this is a really beautiful case, i thing in the night, with some leds, this case is very lovely.
LikeLiked by 1 person
Hey! I have actually seen this case with LED lights and it indeed looks amazing! Thanks for commenting, what is your instagram handle?
LikeLike
Being honest, I arrived to your blog tonight due to the Riotoro CR280 review (I have one under my desk which I am planning on how to properly build it), and while that does not become reality, I am inclined into building an HTPC that will be at the living room here more for my parents usage, and it is the first time I see a case where that seems possible. The minimalistic design to it along with the possibilities it brings seems to be fantastic. I have a few questions related to the PSU, since that is also a concern, I thought about pairing the case with a Seasonic TFX PSU, there are some good ones, but I got in doubt if the Flex ATX is compatible with the TFX standard, usually the dimensions for it are (WxDxH) 85X175x64 mm, would that be a good match for it ? or the dimensions for Flex ATX are more closely to an 1U unity ?
Thanks and keep up the really good job with the reviews!
LikeLiked by 1 person
Hey! Interesting that you have a CR280! I would love to see the build once it’s finished! This case would definitely be a good HTPC case! No unfortunately TFX power supplies are too large to fit in this case! Flex ATX are much thinner.
LikeLike
This has the capability to be able to do more than I expected it to; it’s fantastic!
LikeLike
Excellent review. What is the total weight of the build fully assembled?
LikeLike
You know, it was quite light weight, although I can’t give you an exact weight but most of the weight came from the power supply! I’d say it was definitely under 5 pounds. Hope this helps! Glad you enjoyed the review!
LikeLiked by 1 person
Thanks for your reply!
I am after an Mini-ITX system that is light enough to easily carry to and from college in my checked in luggage, can game reasonably (mostly older fare like Sonic Generations and Star Wars: The Force Unleashed, and Dolphin GameCube and Wii emulator) and is easily upgradeable. In essence, I am looking for an ITX build that nears Alienware Alpha weight and size. Up until now, I saw the IN WIN BQ656T and Antec ISK110-VESA as the only contenders. This lightweight acrylic Geeek A10 case seems to fill all my requirements.
The only other option is the DAN Cases A4-SFX, but that is a bit pricey for my taste and still in the drawing board stages. Now, I am down to deciding between two systems: if I want to just go the integrated GPU route with an Iris Pro system (Broadwell i7 5775C, or Kaby Lake Iris Pro if that hopefully happens) and have the smaller, sleeker IN WIN; or go with the slighter bigger Geeek A10 and have a low profile MSO Geforce GTX 750 Ti, or possibly a GTX 950 if that ever is possible.
The only thing that I am on the fence about is this case’s main panel which has no ventilation holes to speak of. If Geeek offered a version with more vents, I would jump on it, especially given the low price and excellent build quality!
LikeLike
Hey! I am actually preparing to build a portable PC soon too.
I think you can go two routes. GPU and no GPU. If you choose to go no GPU, your best bet would be to go with an AMD APU like the a10-7870k or a10-7890k that just released, these processors have powerful enough graphics to play all of the games you mentioned pretty well! If you were to pick this Geeek A10 case I would suggest going with one of these APU’s. Not having a GPU will also help with weight a bit! Honestly this case would be great to carry around as it really is not that heavy at all. I wouldn’t worry too much about the ventilation. The case has many sets of ventilation strips that do a decent job!
If you really want a discreet GPU I know that there is a very small case that can fit a GPU, the Logic Supply mc600. I think it’s about $100 which is a bit pricey but I believe it is currently the smallest case available that can fit a discreet GPU.
Hopefully this helped! Let me know what you end up doing
All the best,
Hector
@mitxlove
LikeLike
Thank you. My one quibble with the A10 chips is they perform only as well as Intel’s U-class 15W laptop CPUs and I need good single core performance for emulating taxing GameCube and Wii games. The Skylake-based i5-6600K has nearly double the single core performance of the best A10 chip and my retired Core M-based Dell Venue 11 Pro 7140 has equivalent single core performance in a completely fanless design. Add to this AMD’s higher energy drain and louder fan noise and AMD just does not seem like all that good of a deal to me. I am thinking I will just get the i5-6600K and wait to see if a half height AMD Polaris R9 470 comes out and then acquire one of those:
http://wccftech.com/amd-radeon-r9-480-470-polaris-10-polaris-11/
LikeLike
I purchased this case a couple of weeks ago. Once I got all the protective plastic off (there’s A LOT of it) the case looks pretty nice. My only issues are:
1). The panel to mount the hard drives on is too flexible/flimsy, and it uses 8 screws to attach to the case.
2). It would have been great if there were a fan slot on the other side of the case too. If you’re not using a flex ATX PSU, there’s nothing over there, and a second fan would allow for MUCH better airflow throughout the case (although the airflow isn’t bad as-is).
3). The power LED on the front is extremely bright. Although a resistor can fix that.
Installed parts are:
Intel i3-4160T
MSI GTX 750ti (low profile obviously)
Gigabyte GA-H81N ITX motherboard
Crucial Ballistix Tactical 8GB (1X8GB) DDR3
128GB MSATA SSD.
Picopsu 160xt + 192w power supply
The graphics card fits in the case, but I couldn’t install an 80x80x25mm case fan internally. An 80x80x10mm fan may have worked as there is a little space between the gpu cooler and the side panel, but I didn’t have one on hand to test that out. Instead I just mounted a standard depth fan to the outside of the fan cutout. Also the HDMI plug location on the card interferes with the rear of the case so I couldn’t use it, and had to use the DVI connection instead (which luckily outputs 5.1 audio as well with a DVI to HDMI adapter).
My cpu was hitting 65°C without the 80mm fan installed after running Prime95 for 20 minutes. Temps went down to 55°C with the fan installed. I’m cooling it with a Silverstone NT07-115X. Needless to say the graphics card stays incredibly cool with fresh air blowing directly onto it. I may try taking the fan assembly off the card and install the 80mm fan internally.
Overall this is an excellent case and exactly what i was looking for. I wanted something to fit my half height 1.5 slot GPU, have headroom for a decent CPU cooler, and be as small as possible. If they could modify the case to fit a slim optical drive under the motherboard to attach to the front of the case, and add an option for a second case fan, it would be PERFECT, and I’d happily pay double for it. But as it stands I’m very satisfied. I’m planning to upgrade to a more powerful 65W processor in the near future, and probably a Big Shuriken 2 (which does fit this case). I’ll report back with results.
LikeLiked by 1 person